Pages

Thursday, October 14, 2010

Cherry Tomato Pasta Aglio Olio


OK, so i haven't had any memories about my recipes lately but i definitely have one for this recipe. Well i remember that one day i came home from Saturday school and i was starving. I asked my mom what was for dinner and she told me spaghetti, like almost anyone i was excited. I looked in the pot and got really mad! At the time Mimo (my second mom) was over and she kept telling me it was so good. I tried the pasta and fell in love, of course being stubborn i didn't let my mom know my fit was for nothing. I have been looking for a recipe like the one my mom made that ONCE (she never made it again i wonder why) so i found cherry tomato at the market the other day and figured i would just make up a recipe, and boy was it good!
Fresh basil is VERY important! pick them, wash them and stack them
roll them up gently and cut so you get long thin strips
like this, its called chiffonade.
Aren't these so cute, they reminded me of little san marzanos. You can use any type of cherry tomato, if they are really big then just cut them in half.
i used a whole head of garlic and chopped them finely, don't smash them, you want it in small chunks so when it cooks it becomes sweet.
Put olive oil in a pan and heat, when the oil is hot add the garlic and cook for about 2 minutes. Make sure to keep stirring so that the garlic doesn't burn and become bitter. At this point add in a little of the pasta water.
Add in the cherry tomatoes a cook.
Once they start to shrivel and are getting soft add in more pasta water
crush about half of the tomatoes to get a slightly pink tomato sauce.
Once the dish is done cooking add in the pasta (spaghetti) and basil and some freshly ground black pepper.
Garnish with shaved Parmesan cheese.

Written Recipe:

1 pound of spaghetti noodles
1 pint of cherry tomatoes
1 head of garlic finely chopped
10 leaves of basil chiffanaaed
1/4 cup of olive oil
1 1/2 cups of pasta water

Fatayer

Fatayer are the PERFECT thing for parties and even to keep in the refrigerator or freezer and heat up whenever you need a snack. I love these because there are so many different kinds of fatayer, zaatar, cheese, meat, spinach, sausage and pizza. In this post i am showing you how i make my fatayer dough and the fillings or toppings. Feel free to change anything you want to your taste. One day i am going to buy a pizza stone and then hopefully they will be more like the yummy fatayer in salhiyeh. Oh and if anyone is reading this and knows how to make those fatayer they make in Syria (mhammara) the spicy ones with cheese on top please let me know.

Well of course we start off with yeast and sugar
Add in the warm water and wait until it starts to activate (about 3 to 5 minutes)
Once the yeast is activated add in olive oil and flour and salt (mix the salt with the flour so you don't kill you yeast)
slowly mix in the flour until you get a soft dough that it wet but isn't sticking to your fingers.
Place it in a greased bowl and let it double in size. Usually i turn my microwave on for 30 seconds and THEN i place the dough in there.
oooo look at that big bubble! Ok so i don't punch down my dough but feel free to if that's what you like.
I roll out my dough and using a biscuit cutter i cut all my fatayer to the same size
This is an option on how to shape a cheese fatireh. I made all of mine flat because i wanted to freeze them and it takes up less room.

So for the spinach filling you need either baby spinach or regular spinach that is cut. Make sure to wash your spinach well and let it dry. Sprinkle salt and begin to squeeze the spinach. I actually got exact measurements from, none other than Najats Kitchen on youtube, however most people add the same stuff except different amount.
It is going to start to look like cooked spinach and will release A LOT of water.
SQUEEZE!!!!!!!!!
I did this 3 times and i got about a cup of water each time. Just keep squeezing until you cant get any more water out.
Then mix in the onion, lemon juice, olive oil, sumac, cumin, arabic spice and pepper.
I found pomegranates at the market and couldn't resist so i halved my spinach mixture and in one i added pomegranate seeds and the other i added red pepper flakes. These two additions are totally optional but i like them.
So after the dough is rolled out (roll the dough for the spinach a little thicker that for cheese and meat pies because when they cook they will release more water and if the dough isn't thick it will break and leak water everywhere.
Pinch the two sides together
Then fold up the last side so that the spinach pie is a triangle...DONE
Now i am not sure how to make the meat mixture but this is how i make mine. I take ground beef and mix it with pomegranate molasses, arabic spice, salt tomato paste and a little oil (i use lean beef)
Take the circles and press down to make them thin and long, then press in the meat mixture and decorate with pine nut (pomegranate optional)

To distinguish between which spinach pies have pomegranate seeds and which ones are spicy i sprinkled some sumac on top of the pomegranate spinach pies.

Written Recipe:

Dough:
3 cups of flour
1 teaspoon of yeast
1 cup of warm water
1 tablespoon of sugar or honey
salt
2 tablespoons of olive oil

Spinach: Modified from Najats kitchen on youtube
spinach sprinkled with salt and squeezed until 3 cups of spinach are left
1/2 cup of onions
1/4 cup of lemon juice (I use citric acid to lessen the moisture in the pies)
1/4 cup of olive oil
2 tablespoons of sumac
1/4 teaspoon of arabic mixed spice
1/4 teaspoon of pepper
1/4 teaspoon of cumin
red pepper flakes and pomegranate seeds optional

Meat:
1 cup of lean ground beef (or 80/20 if you don't want to add oil)
2 tablespoons of pomegranate molasses (dibis rimman)
1 tablespoon of oil
1 teaspoon of arabic spice
1/2 tablespoon of tomato paste
salt to taste
(suggestion, cook up a little meat and taste it because some pomegranate molasses is sweeter or more sour than other)

Cheese:
Any cheese that will melt
sprinkle with black seed (optional)

Thursday, October 7, 2010

Mhalabieyh


Ahhhhhhhhh, how i love dessert. I especially love pudding and this dessert is an Arabic milk pudding. This is very easy to make and great for when you have a huge party and don't want to spend all day cooking desserts after you already cooked a bunch of food. This can be made many ways and it is the basis for many other desserts like haylatiyeh (unsweetened and thicker and atar is poured over) or riz oo haleeb (rice pudding). This can also be eaten for breakfast with a yummy Arabic cheese sandwich (jibneh bayda and samoon bread). When i make this usually i put it in individual cups because the more you scoop into it the more water might be released. If you are making this for a party then putting it in one large dish is perfect. Here is how i make Mhalabiyeh.
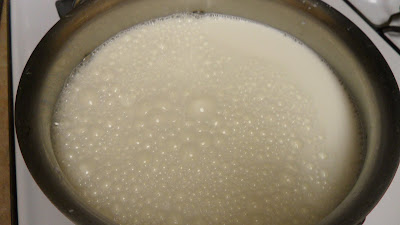
First start off with milk (whole milk is preferred but 2% can be used although more starch might be needed)
Corn starch is obviously very essential. I believe back in the olden days they used rice flour to make this. Rice flour works well except that it takes longer to thicken so if that is all you have be patient. Also rice flour, in my opinion, leaves a slight flour texture in the milk pudding.
So while the milk is still cold add in the sugar. Normally i add 1 tablespoon for every cup. Feel free to adjust to your taste, you can taste this at any time in the cooking process.
Mastic or mistica is a resin or sap (i think) from a plant in the Middle East. It is used a lot in Middle Eastern desserts and it really does make a huge difference in taste.
So the mastic comes in like little pebbles. So in order to turn the pebbles into a powder so it can dissolve we need to grind it with some sugar.
So once the milk is warm (not boiling, never boiling until after the corn starch) we add a cornstarch slurry. This just means that you mix corn starch with water (or milk) until it is pourable. So for every cup of milk you need 1 tablespoon of cornstarch.
While the milk is thickening with the cornstarch smash your pistachios for garnish. I just put my nuts in a coffee grinder and....
Then i get finely ground pistachio. Feel free to make it however fine or chunky as you like. Usually Arabic desserts are topped with finely ground pistachios.
So after the milk is thick add the mastic and add rose water and orange blossom water. Then pour the mhalabiyeh in either individual serving bowls or in a large serving bowl (like a Pyrex or something that is all one level, not literally a big bowl.
There are so many ways or garnishing the mhalabiyeh so feel free to be creative. I had some rose jelly so i added some of that as well.
Yummy

Written Recipe:
6 cups of milk
6 tablespoons of sugar
6 tablespoons of cornstarch dissolved in water
6 pebbles of mastic ground with sugar
3 teaspoons of rose water
3 teaspoons of orange blossom water
3 tablespoons of whole pistachios ground finely

Shockingly i didn't have a story for this recipe....oh well!

How to Fold a Grocery Bag

First off.....I AM VERY BEHIND! I just finished downloading all the pictures from my camera to my computer and realized i have at least 15 recipes to post still! So, of course, another story behind folding bags. Once i was at Ranya's house and i asked for a plastic bag for some reason and so she gave me one. I looked at her and i was so shocked, Why was her bag not crinkled like grocery bags normally are? She looked at me like duh and said "I fold my bags". Okay of course leave it to Ranya to fold her grocery bags! Anyways so the other day (actually a few months ago) i went grocery shopping and i had a lot of bags (i re use my bags so i save them) so i decided to learn how to fold bags . Now you are probably thinking, "what does this have to do with a food blog" WELL for your information in order to cook you need to go buy groceries and in order to bring your groceries home you need bags. I didn't really need to justify myself but i did anyways, oh and side note (yet again) this is a real space saver. Anyways here is how i learned how to fold bags:

Start off by laying your bag flat
then fold the bag in half (make sure to iron it with your hand so it is as flat as possible)
Then fold it once more so that it is long
Then you are going to fold the corner up to make a small triangle (kind of like folding a spanikopita)
Then fold it again
Then once more to make a point at the bottom.
Keep folding the triangles up
Then comes the handle

Fold so you are left with a point
Then life it up and tuck the rest into the crease
And there you have it a perfectly folded plastic bag
See how compact they are and NOT WRINKLED!